
Choose your path
Start with the job you need to finish.
- Fresh installFollow the core onboarding path, then stop when the instance can receive an event.
- Add a serviceUse the optional add-on chooser to open only the settings and detailed guide you need.
- Change settings laterUse the maintenance path to rotate credentials or move between environment and UI values safely.
Quick path
Go from a booted app to a usable install.
- Run release migrations and start Rails with PostgreSQL connected.
- Claim the first administrator at
/setup, then remove the one-time setup token. - Complete the General and Redis & jobs checks. Restart web and worker processes when prompted.
- Skip every optional service you do not need yet, then complete installation.
- Create a project and API key, send one test event, and confirm the project's First event step shows it.
Progress survives restarts
Logister stores onboarding progress, skipped sections, successful check fingerprints, and a redacted change history in PostgreSQL. A restart or interrupted setup does not force the administrator to begin again.
Before you start
Have the baseline running before opening setup.
- A reachable PostgreSQL database and completed Rails migrations.
- A Rails web process serving the instance over its final HTTPS hostname, or a temporary local hostname for evaluation.
- A provider secret store for the Rails master key, database URL, one-time setup token, and any add-on credentials you keep in the environment.
- A provisioned Redis or Valkey service plus a separately running Sidekiq worker before the required worker check can pass.
You may provision optional providers now or return to them later. The Logister UI stores and tests connection settings; it does not create Redis, SMTP, ClickHouse, S3, GitHub, Turnstile, or analytics accounts.
Claim the instance
Create one confirmed, database-backed administrator.
- Generate a long random token and set it as
LOGISTER_SETUP_TOKENon the Rails web process. - Restart the web process and open
https://your-logister-host.example/setup. - Enter the administrator name, email, password, and the same one-time setup token.
- Select Create administrator and continue. The new account is confirmed and receives the application administrator role.
- Remove
LOGISTER_SETUP_TOKENfrom the deployment environment and restart the web process again.
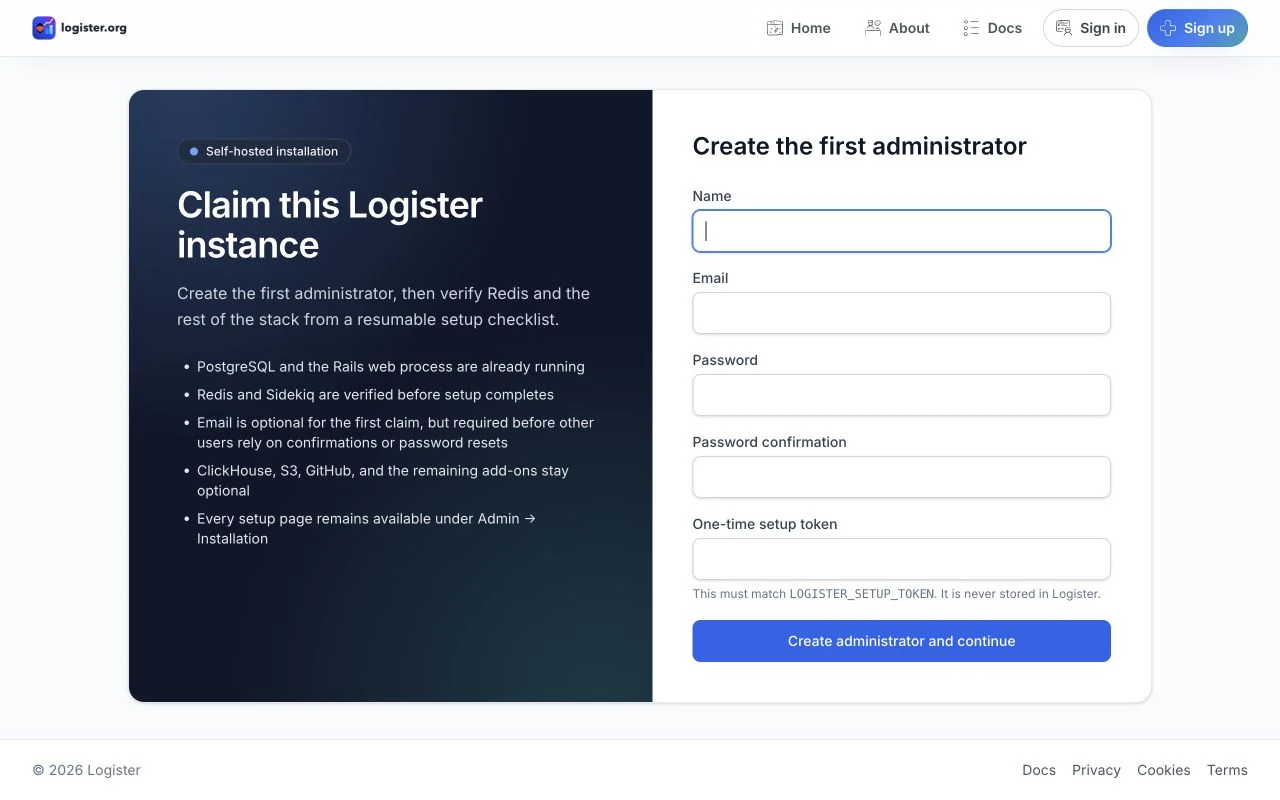
Remove the token after the claim
Logister never stores the setup token, and later visits to /setup redirect to sign-in after the instance is claimed. Removing the environment value closes the bootstrap path at the deployment layer too.
Persistent workflow
Use the same pages during onboarding and later operations.
Admin → Installation is both the first-run checklist and the permanent configuration area. Required and optional sections show Pending, Verified, Skipped, or Changed. A previously verified section becomes Changed when its effective configuration no longer matches the saved successful-check fingerprint.
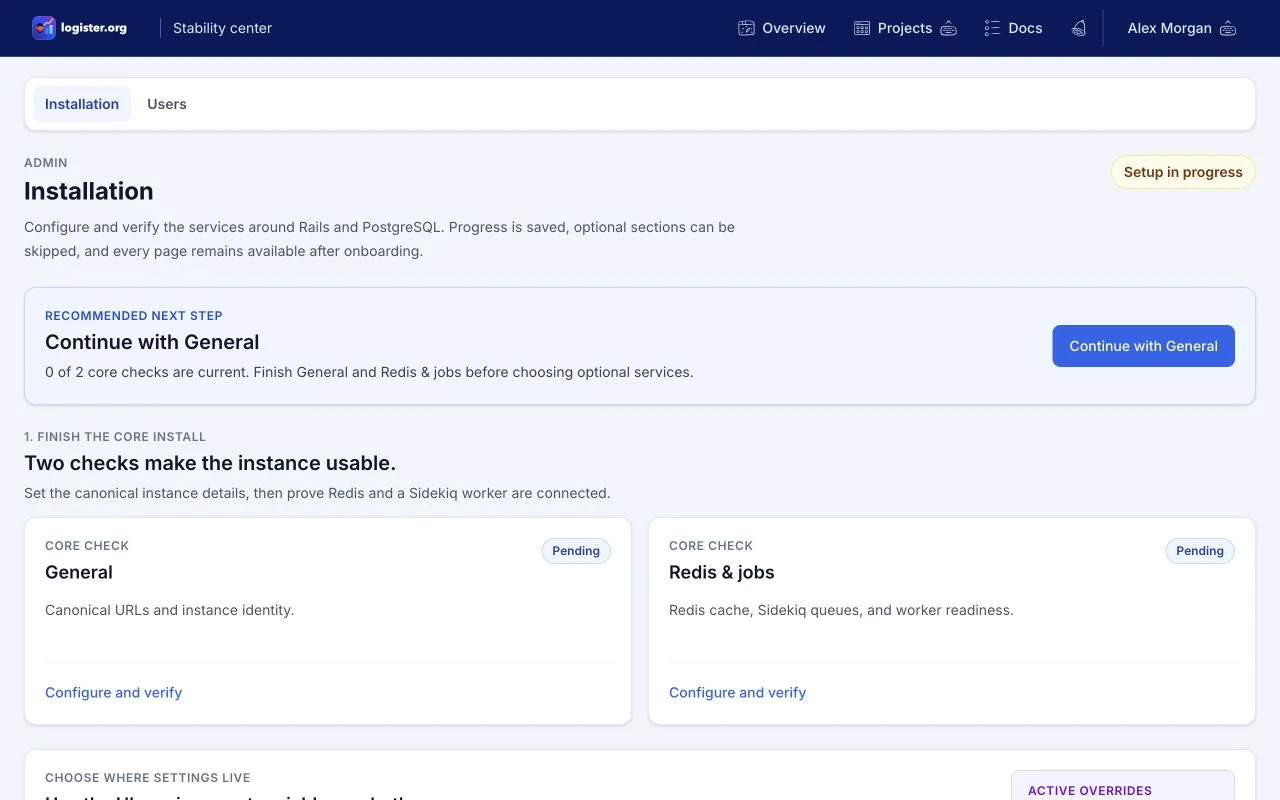
Optional sections can be marked Skip for now. Skipping does not delete saved values, so an administrator can return, configure the provider, run the check, and enable it later.
UI and environment values
Choose the configuration path that fits your operations.
| Path | Use it when | What Logister does |
|---|---|---|
| Admin UI | A small operator team wants to configure and test services without changing deploy manifests. | Stores values as encrypted database fallbacks. Secret fields are never displayed again, and audit entries omit values. |
| Environment variables | Your platform, GitOps workflow, or secret manager owns production configuration. | A nonblank environment value overrides the saved fallback. The page names the active variable, but never renders a secret value. |
| Environment plus fallback | You may remove a deploy-time override later or need a safe transition between providers. | The environment value remains effective while the administrator can edit the saved fallback that will take over after the variable is removed. |
Resolution order is nonblank environment variable → encrypted saved fallback → application default. Blank environment variables do not mask a saved value. Restart every process named by the page after changing a setting marked Restart required.
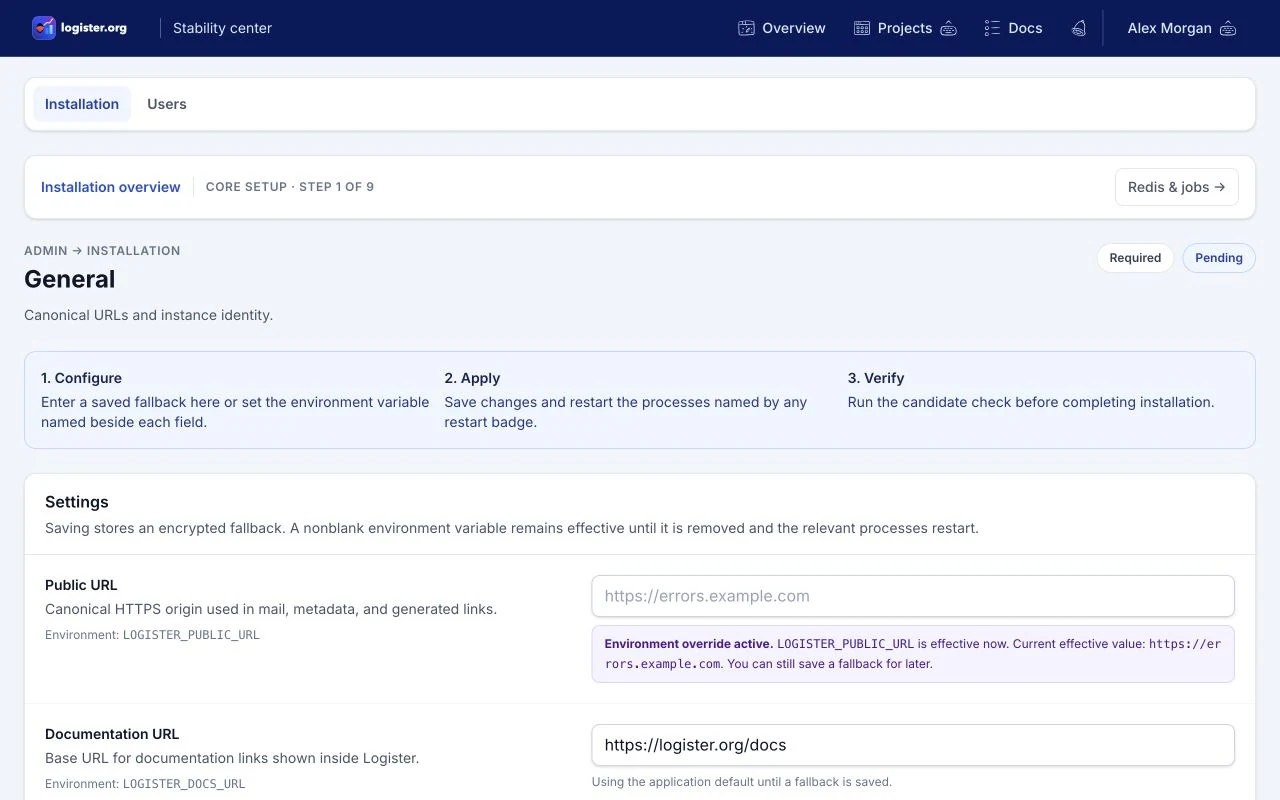
Test the effective configuration
Test candidate values combines the values entered on the page with any active environment overrides. Save first when a check must exercise the running process or send mail, restart when prompted, then rerun the check.
Required checks
General and Redis & jobs must pass before onboarding completes.
| Admin path | Settings | Passing check |
|---|---|---|
/admin/installation/general | LOGISTER_PUBLIC_URL, LOGISTER_DOCS_URL, LOGISTER_EMAIL_FROM, and LOGISTER_API_KEY_PREFIX. | Canonical URLs, email sender, and API key prefix are valid. |
/admin/installation/background-jobs | REDIS_URL and SIDEKIQ_CONCURRENCY. | Redis answers PING and at least one Sidekiq process is registered against the same Redis service. |
- Save the General values and run Test candidate values.
- Save Redis and concurrency, then restart both web and worker processes because booted clients keep their existing connection settings.
- Start the worker with
bundle exec sidekiq -C config/sidekiq.yml. - Run the Redis & jobs check. A reachable Redis server without a registered worker is not enough.
- Return to the overview and select Complete installation after both required cards show Verified.
Optional add-ons
Choose an add-on by the outcome you need.
You do not need to learn every setting before choosing. Open one admin page, read the variable name beside each field, and use the linked guide only when that service needs provider-side work.
/admin/installation/email. Stop when one direct and one queued test message arrive.
Move analytics work off PostgreSQLOpen /admin/installation/clickhouse. Use dual write for backfill and verification, then switch to read preferred; dual write alone does not move dashboard reads.
Archive telemetry before pruning itOpen /admin/installation/archive-storage. Stop when a temporary object can be written, read, and deleted.
Show private source during triageOpen /admin/installation/github. Verify the App identity, then link repositories from the project's Settings › Integrations.
Protect public auth and tune ingest limitsOpen /admin/installation/authentication. Validate keys and limits, restart, then complete a real Turnstile challenge.
Add consent-aware public analyticsOpen /admin/installation/public-site. Stop when the public URLs and consent prerequisites validate.
Monitor Logister itselfOpen /admin/installation/observability. Validate the endpoint and sampling ranges, then send sample telemetry.
For a GitOps or secret-manager deployment, use the variable names shown on the selected admin page. The complete list remains in Deployment configuration and the repository's .env.sample.
ClickHouse cutover
Use dual write for verification, then finish the dashboard-read cutover.
- Provision ClickHouse, keep PostgreSQL as the durable product database, and select
dual_write. This temporary mode copies telemetry but keeps supported dashboard reads on PostgreSQL. - Save settings, restart web and worker processes, and keep Sidekiq draining new writes.
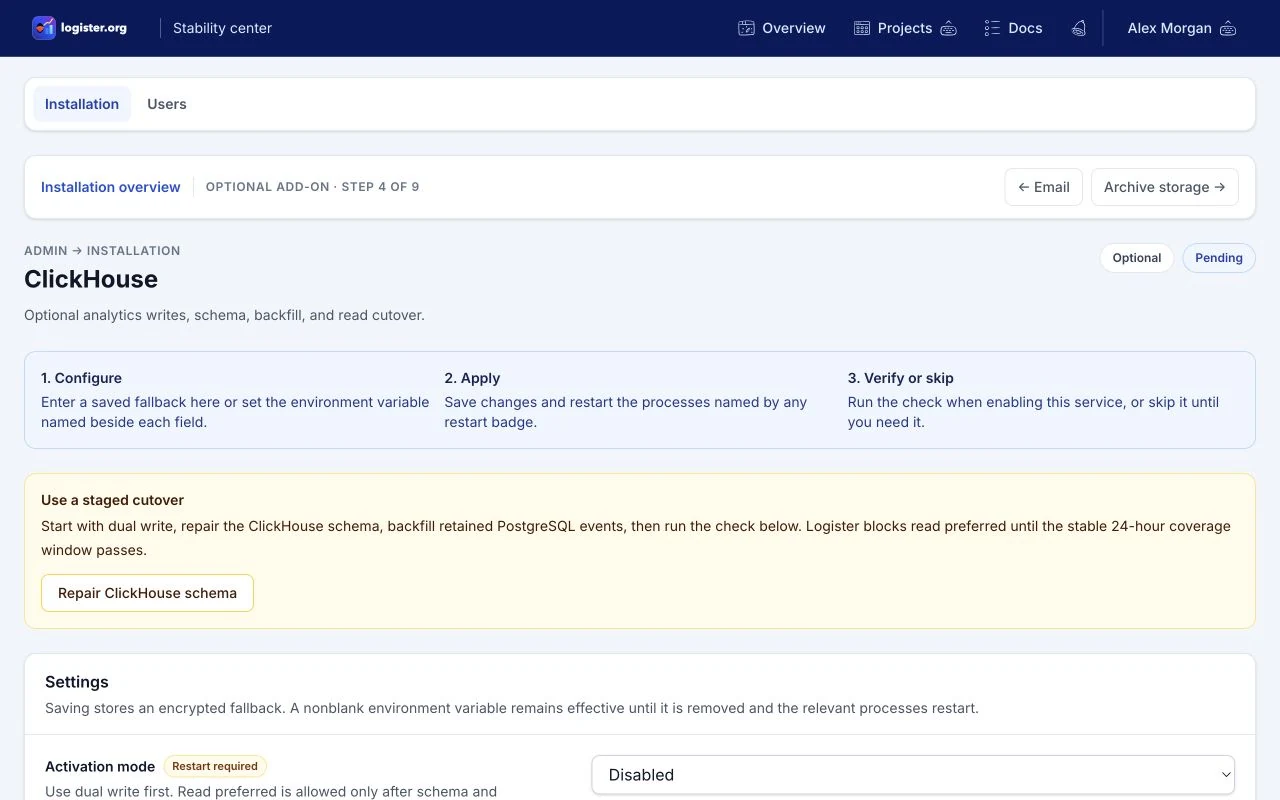
- Run Repair ClickHouse schema with an account allowed to create or repair the required objects.
- Backfill retained PostgreSQL events with the idempotent command in the ClickHouse backfill guide.
- Run Test candidate values. The check compares distinct event IDs in a stable window that excludes the newest five minutes.
- Select
read_preferredonly after the current connection fingerprint has passed schema and coverage checks. This is the step that moves supported analytics reads to ClickHouse. - If your deployment uses environment variables, set
LOGISTER_CLICKHOUSE_MODE=read_preferredand remove the legacyLOGISTER_CLICKHOUSE_ENABLEDoverride. Restart web and worker processes. - Call
/health/clickhouseand confirmclickhouse_modeisread_preferred, not only that the endpoint returns200.
Later maintenance
Return to Admin → Installation whenever configuration changes.
- Rotate saved secrets by entering a replacement and saving. Secret fields never reveal the existing value.
- Use Remove the saved fallback only when the environment or default should become the next source.
- When removing an environment override, save the intended fallback first, remove the variable from every applicable process, restart when required, and rerun the check.
- Rerun a section check after credentials, URLs, provider permissions, schema, or worker topology changes. A Changed status blocks required setup completion until the current fingerprint passes again.
- Use Recent history to see who saved, cleared, skipped, repaired, or tested a section. Values and secrets are deliberately absent from the audit trail.
Verification
Prove the install works beyond the settings pages.
- Confirm
GET /upreturns200. - Confirm General and Redis & jobs remain Verified after the final restart.
- Create one project and one project API key.
- Send a test event from an SDK or the HTTP API and confirm it appears in the project's Issues.
- If email is configured, confirm both the direct and queued test messages arrive.
- If archive storage is configured, verify its temporary-object check and then configure a project retention policy.
- If ClickHouse is configured, confirm
/health/clickhousereports ready,clickhouse_modeisread_preferred, and the coverage gate has passed before relying on ClickHouse-backed dashboard analytics.
If a check fails, use the exact failure summary on its Installation page, then continue with Troubleshooting. For all production variables and restart behavior, use Deployment configuration.